Growing up on a farm in Western Pennsylvania, my siblings, cousins, and I spent many hours running around in our crumbling old barn. I still remember fondly the sweet smell of the stacks of hay we kept for the sheep. Maybe that’s why ever since I saw a barn door at a friend’s house in Philadelphia, I’ve been wanting to get one for my own condo. Turns out though that barn doors are quite the fad these days, and these babies aren’t cheap! I saw some that were over $1,000! If that’s just the cost of the door, you have to wonder how much that whole barn cost…!
Cost aside, as I researched more, I realized that there were several other factors I needed to consider. For starters, living in a Philadelphia condo, space is scarce; spots spacious enough to accommodate a large, heavy, sliding door are hard to come by. Luckily, I did have one spot (literally, ONE spot in our entire condo) where I could install a barn door: As a replacement for our laundry closet door. BUT…there were other issues to address:
- The width of my laundry closet door opening is 38 inches, so the 36-inch width of most standard doors was too narrow for my needs. I wanted a door that was at least 40 inches wide.
- At the same time, the 84-inch height of most standard barn doors was too tall; I needed it to be about 78 inches at most to fit.
- To make matters worse, our ceiling is atypically low by the laundry closet, so I only had a maximum of 3 inches of clearance above the door opening; in other words, the wheels and the railing of the barn door would have to squeeze into that 3-inch space…!
- Additionally, since our water heater is also installed in the same closet, I needed a door design that would maximize airflow. Typically, you would install a louvered door — but then it wouldn’t really be a barn door.
Given all these constraints, it became obvious that we needed a custom-made door, but I wasn’t willing to pay the premium that would entail. Yet, not willing to let my dream die such a quick death either, I decided I had only one option left: I had to make the door myself.
Thus began my journey over the winter holidays. To be clear, I’m not a “professional” DIYer; I’m a hobbyist. Which means I don’t have tons of tools. Since I live in the city, I also don’t have the space to work on major projects, and as it turned out, building a barn door isn’t exactly the easiest DIY project. But after multiple trips to Home Depot, a generous dose of trial and error, and pure doggedness, this bad boy finally came together — and all for the bargain price of $220 (not including the cost of blood, sweat, toil, and tears).
The Door Design
In full disclosure, this beauty isn’t the most DIY-friendly barn door design. There are far simpler designs out there for you to choose from. But, I didn’t like the look of those designs. Also, I didn’t have the tools or the space to make something out of plain plywood and paint/treat it to get the look I wanted. So, I designed this door literally on the spot while standing in the lumber aisle at Home Depot and eyeing what they had readily available. The Home Depot lumber associate — let’s call him “CJ” — showed up, and lickety split, I had him cut several pieces of the pre-treated trim for the door slats along with two pieces of black shiplap for the side borders.
 Designing the door on the spot at Home Depot
On a whim, I had CJ trim the leftover pieces of the shiplap to match the length of the inner slats. This proved to be a smart move because as I learned later, CJ failed to cut all the slats to the same length! I was not a happy DIYer when I got home, laid out all the pieces, and THEN found out that several pieces were cut too short!
Painful Lesson #1: No matter how professional “CJ” looks or how many measurements he takes prior to cutting the wood, measure the pieces yourself before you take off!
Nevertheless, I rallied and tried different ways to put the door together. My first attempt, which consisted of gluing the slats horizontally to the edges of the vertical shiplap pieces, started off well and good. However, when I tried picking up the “door” several hours later, all the slats fell off with a thunderous clatter.
Painful Lesson #2: Glue by itself was not going to hold the pieces together!
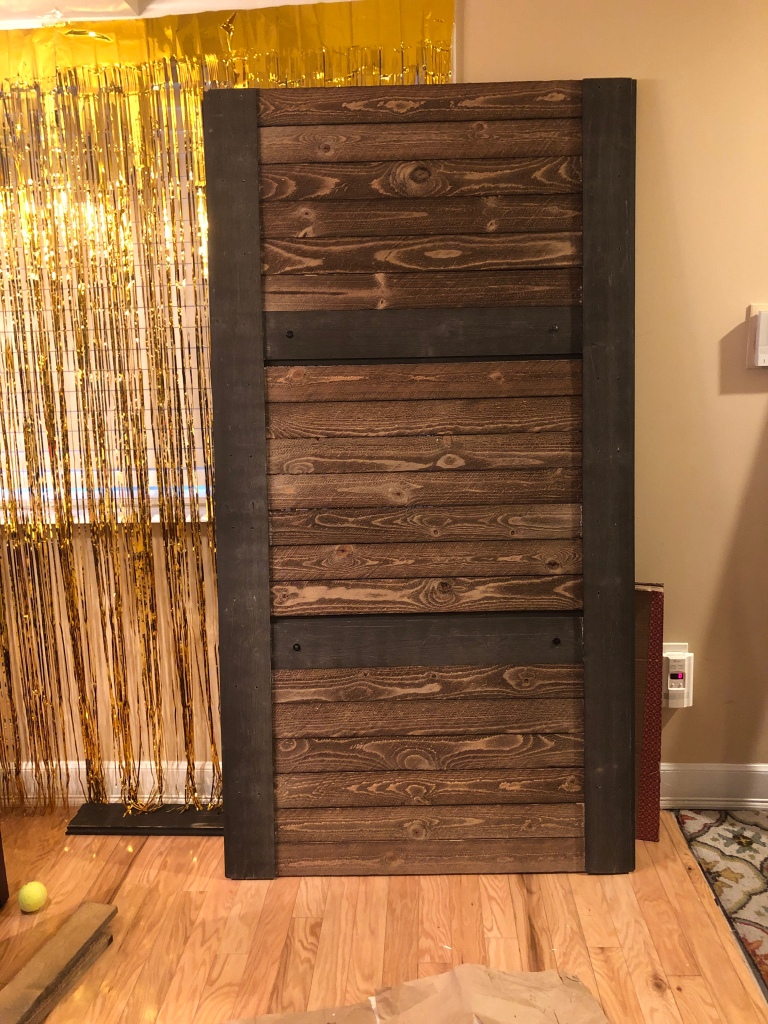
Back at square one, I shifted all the lumber outside and laid out the door again. This time, instead of gluing the slats, I hammered in nails at an angle from the edges of the shiplap into the horizontal slats on both sides. Lining up the slats so they were equally spread out with the top and bottom pieces not sticking out above/below the shiplap borders was a bit of a challenge, but I managed this by securing the top and bottom slats in place first and then working inwards. As a workaround for the shorter pieces, I used metal “strap ties” to attach them to the shiplap. To ensure that I had a sturdy central frame, I attached the two inner shiplap pieces to the outer ones with metal T-plates. To secure these T-plates, I used a bolt+nut in the center for the strongest grip possible (also because the hex bolt gave a nice look in the front) and used longer screws on the sides. I had initially planned to use bolts+nuts on the sides as well, but I ran into another problem: the thickness of the door. Another downside of my design choices described above: I had to be extremely stingy with the door thickness. Every millimeter of thickness increased the risk of the door scraping against the wall (which in my initial trial it did). So jutting bolts+nuts were a no-go.
Painful Lesson #3: If you’re going to spend several hours kneeling on concrete, get a pair of knee-pads; your knees will thank you later!
With this work completed, I finally had a respectable door. What’s more, because of the gaps in between the slats, there would be ample air circulation for the boiler. However, I didn’t like that the slats didn’t sit flush with the shiplap borders. Thankfully, shortly after my failed gluing attempt, this possibility had occurred to me (some good came out of that failed experience after all). So, I had preemptively adjusted my design and decided to add pieces of shiplap over the original shiplap borders to “sandwich” the edges of the horizontal slats. This hid the edges of the horizontal slats and resulted in a much nicer-looking door.
One of the last things I added was a door handle. I opted for the slightly more “premium” Everbilt Heavy Duty Gate Pull because I didn’t want to cheapen the look of the door after all the effort I had put into building it.

Railing & Wheel Hardware
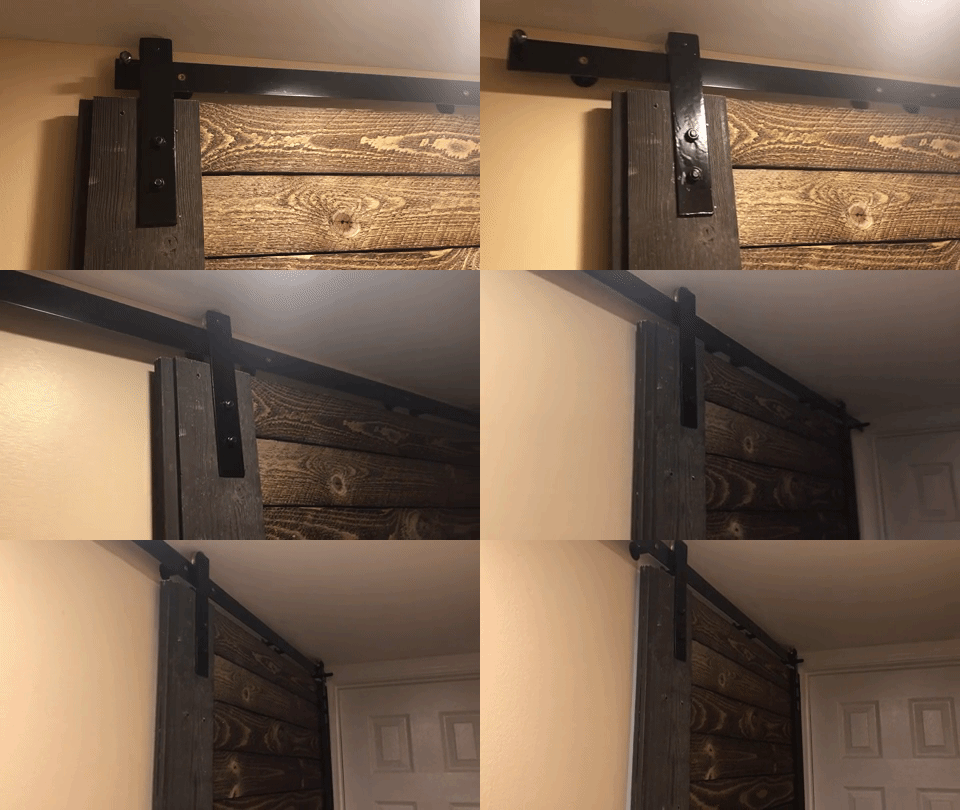
I was hoping to buy the railing and wheel hardware ready-made. However, due to the limited 3-inch clearance I had between my door opening and ceiling, I didn’t have much of a choice. I had to make the hardware myself, too. Thankfully, the ladies over at Shanty 2 Chic posted a very detailed DIY video and step-by-step description with links to all the parts they bought. I found their post incredibly helpful and based my hardware design off of their work. However, because I was making a far heavier, actual door and not a small cabinet door like they did, I changed a few things:
- Instead of the nylon clothesline wheels Shanty 2 Chic used, I used the metal wheels from Everbilt 1.5-inch pulleys
- Instead of 1-inch nylon spacers like theirs, I used 1.5-inch metal ones (from Amazon); I needed them longer than 1-inch due to the greater thickness of my door (the issue I mentioned above)
- For the base of the railing screws, I used 1.25-inch fender washers from Home Depot
- I added “stoppers” on both ends of the railing to prevent the door from sliding off the edge. I accomplished this by screwing a single hex bolt+nut encased in a nylon spacer on either end. To that end, I had to drill an additional hole on either end of the aluminum bar for each stopper.
One upside of using the metal Everbilt pulley wheels was that after I took the pulleys apart, I was able to use the original bolts and locking pins for the door wheel assemblies.
To cut the aluminum bar, a friend loaned me his grinding machine, which got the job done. I was able to make do with only one 96-inch flat bar by cutting it into one 78-inch piece for the railing and two 9-inch pieces for the door wheel assemblies.
Other than the variations I’ve listed above, I was able to follow the Shanty 2 Chic instructions to build out the railing and wheel assemblies.
Demo Day
As a big fan of Chip and Joanna Gains from HGTV’s Fixer Upper, when the day finally came to start the installation process, I couldn’t wait to say Chip’s magic words: “It’s Demo Day!” 😉
Granted, I didn’t have to tear down nearly as much as Chip usually does on the show, but I made the most of it! In addition to removing the old bi-fold door, I also had to remove the existing door trim. This was because of the limited space I have; I have seen other DIYers just leave the original trim as is.
Trial Assembly
Thankfully, by the time I got to the really “heavy-lifting” part of this journey, my brother-in-law, Fawad, and his family flew into town for the winter holidays, so I conscripted him to help out. Thank God for family 😉 Once the parts were completed, we assembled all the pieces and hung up the door. This helped me understand where I needed to make adjustments. For example, this is when I learned I needed longer spacers and was able to mark off where the bottom bracket to prevent the door from swinging would be installed.
Once all the adjustments were done, we took the door back down and cleaned up the wall. Yes, you cannot forget this part: A nice-looking barn door hanging on a scratched up, dented wall will simply not do. So I spackled and sanded, then painted a white trim around the door opening, and touched up the wall around the door. I also painted the railing and wheel hardware black, but decided to keep the wheels themselves and the rail screws their original gold color because my wife and I liked the contrast. Finally, Fawad and I reassembled everything and hung the door back up.
Final Assembly
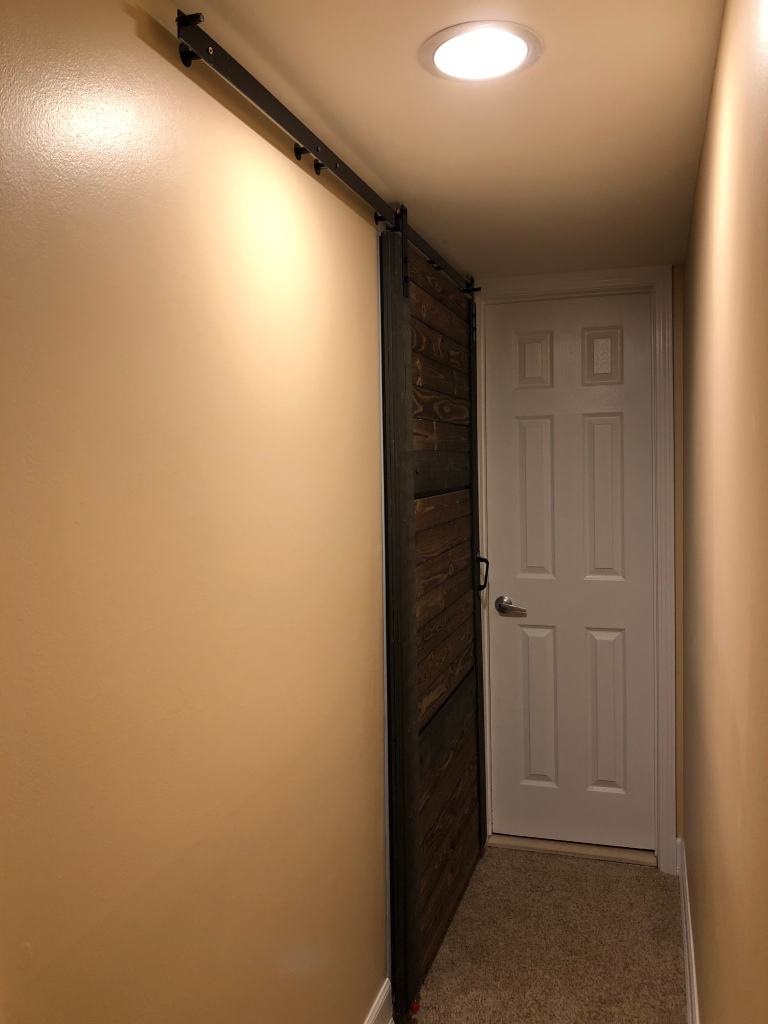
As a final adjustment, I installed a “roller catch” on the right side of the door frame to catch the door as it rolls in. This prevents the door from chipping the paint off the wall. I made it using a framing angle and an IKEA adjustable leveler “wheelie thing” I had lying around.

In Conclusion
Not only does the door look great, it’s also incredibly satisfying to know that it’s the product of my own blood, sweat, and toil 😉 But it has also addressed some really annoying issues we had with our old door:
- Previously, whenever we opened the bi-fold door, it blocked more than half of our narrow hallway. Passing through with the door open was a real pain, and our kids inevitably ran into the door several times.
- Because the bi-fold door didn’t give full clearance into the laundry closet either, we would struggle to pull out our laundry detergent bottle from next to the washing machine.
- Additionally, we could not open the washing machine or dryer doors all the way because the bi-fold closet door would be in the way.
- Finally, we constantly had issues with the bi-fold coming off its track or not closing properly.
Thankfully, with the barn door, all of these issues are now resolved!
I hope you find this post useful. If you’re trying to build and install your own door, feel free to ask me any questions in the comments section below.


This barn door is beautiful and functional! It’s going to be one of our treasured possessions. So proud of you for taking this task and coming up with this awesome result! ❤️
LikeLike
Thanks, Jaan 😊😘
LikeLike
Job well done! Thank you for highlighting “Lessons” you learned while completing this project. Your post is inspirational to all us hobbyists and DIYers out there.
LikeLike
Thanks, Imran! That means a lot. Glad you found this post useful. Good luck with your project!
LikeLike